
|
Safety Emporium for all your lab and safety needs
 The Glassware Gallery
Sublimators
Introduction

Before we can talk about sublimators we should differentiate between two terms that are often used interchangeably:
- Sublimate: To transform directly from the solid to the gaseous state or from the gaseous to the solid state without becoming a liquid.
- Sublime: To cause to sublimate.
In other words, a compound may sublimate or undergo sublimation. You can sublime the compound. You do not sublimate the compound and the compound does not sublime.
In actual practice even experienced professionals will use these words interchangeably, but it is a good idea to be aware of these semantic differences.
The apparatus
Introduction
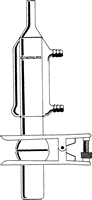
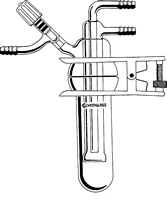
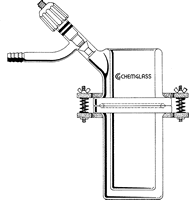
A basic sublimation apparatus (also called a sublimer or sublimator) has a section where the compound to be sublimed is placed and a cooler section above this where the purified material will collect. Typically, the compound is heated and collected on a chilled piece called a cold finger. Usually, but not always, the sublimation is performed under reduced pressure. Several different examples of common sublimators are shown below.
Click on any sublimer below for more information or to order
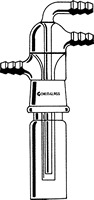 Microscale Sublimer |
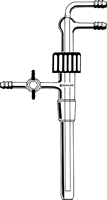 Sublimation Adapter |
 Non-Vacuum Sublimation Apparatus |
 Dailey Vacuum Sublimer |
 Cryogenic Sublimation Apparatus |
Bigger and fancier sublimators also exist. However, some compounds (such as ferrocene) can be sublimed simply by placing them in a Petri dish and then heating the dish on a hot plate.
Handy tips for using vacuum sublimators
- If you are trying to sublime your material for the first time, only use a portion of it -- if your compound is thermally unstable you won't lose the entire batch. Tip: molecules that are spherical or symmetrical have the best chance at sublimation.
- Use an appropriate coolant temperature for your material. If you have to heat it to 200 °C in vacuum, you'll do OK with simple water cooling. However, if your material has volatility at 50 °C, quite a bit will get pumped into your vacuum system if you use room temperature water as your coolant.
- Once the cold finger is coated with material, some of it may fall back to the bottom. To prevent this from happening, place a KimWipe and a fine metal screen between the material and the cold finger. The gaseous material can diffuse past, but any material that falls off will be caught by the screen and can be recovered in pure form.
- When you are ready to collect your sublimed material, release the vacuum by opening the stopcock extremely slowly so you don't dislodge the material from the cold finger or blow impure material onto the cold finger.
- The easiest way to collect your material is to lay out a big piece of aluminum foil. Place a crease in the foil and scrape the sublimated material off the cold finger. You can then easily transfer your product to a tared vial.
- Sublimators with O-ring joints are usually preferable to those with greased joints, particularly for larger sublimators. The greased joints are harder to open and you are likely to touch the joint with your cold finger when assembling or disassembling the apparatus.
- If you are going to pump your sublimator into a drybox, you first need to remove the cooling fluid. This is hard to do because tilting the sublimator enough to empty the fluid could cause your product to be contaminated. A good way to handle this (especially for large sublimators) is:
- Tilt the sublimator to remove as much coolant as you can without risking your product.
- Attach a thin piece of flexible tubing to the end of a syringe needle (Intramedic tubing works quite well). Slide the tubing to the bottom of the cold finger and withdraw the liquid.
- Rinse the cold finger with acetone and then remove the acetone with your syringe.
- Blow air or nitrogen through the cold finger until it is dry.